- Fixings: Always A4 stainless steel screws — never galvanised. PFS+ C2 A4 stainless 4.5x45mm for face fix. Galvanised fixings corrode in contact with larch tannins within 2–5 years.
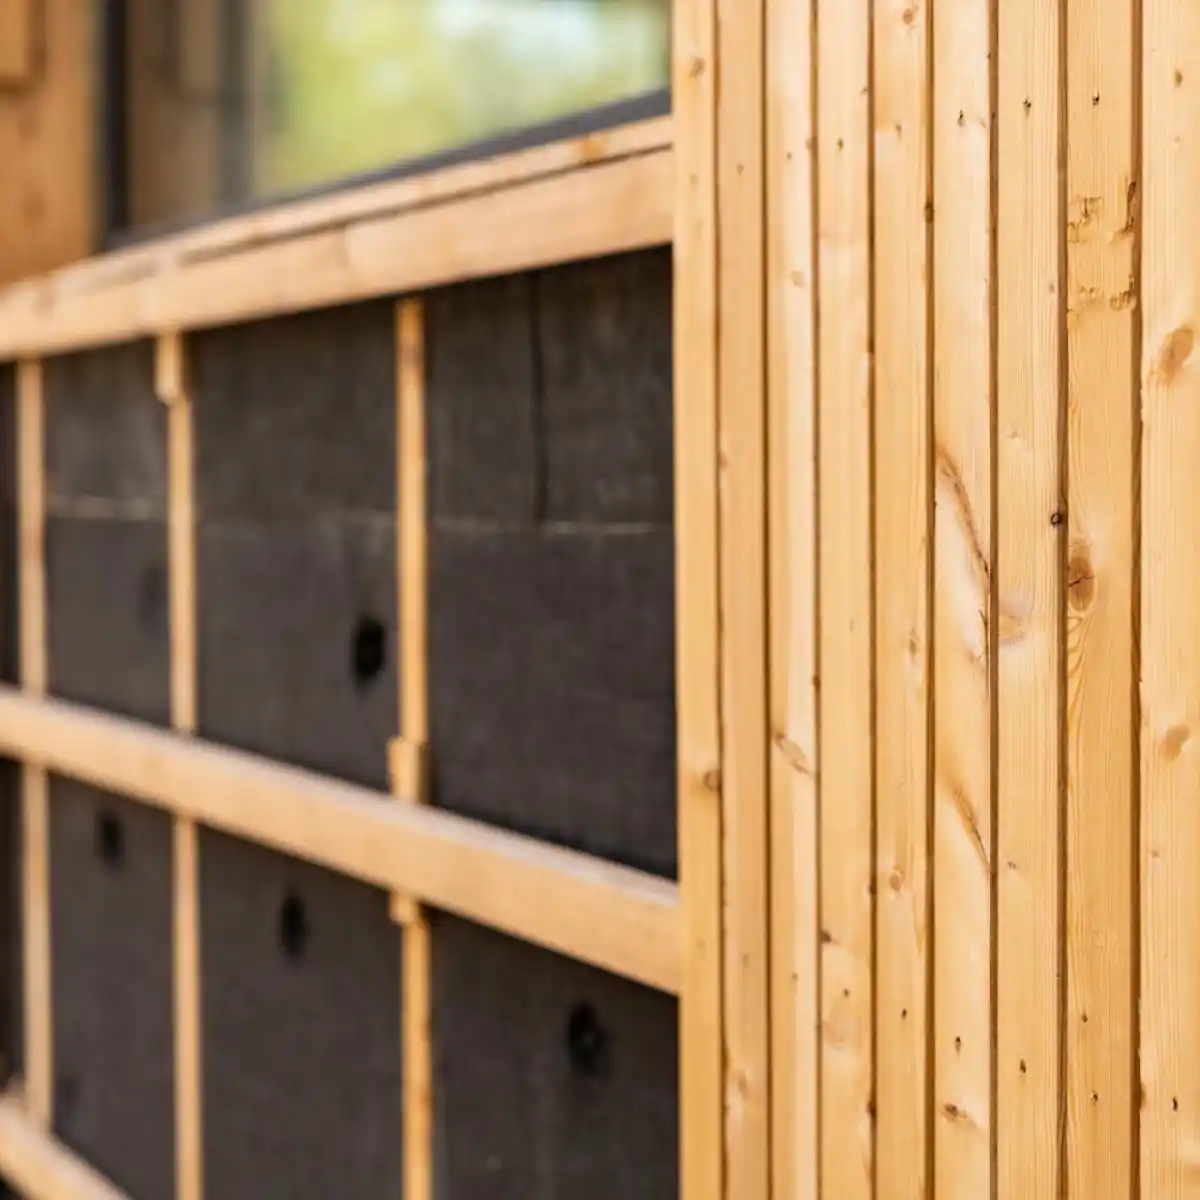
- Batten system: Breather membrane → 25x38mm vertical counter battens → 25x50mm horizontal support battens → cladding boards. Non-negotiable — no ventilated cavity means premature failure.
- Screw spacing: Two fixings per board per batten for boards 140mm+. One fixing for boards under 100mm. Pre-drill within 150mm of all board ends.
- Hidden fix: Tiga facade clip system for rainscreen profiles — no visible fixings, cleaner board face, fits larch and ThermoWood rainscreen profiles.
- Ground clearance: Minimum 150mm between bottom of first board and finished ground level.
- Start point: Always fix from the bottom up. Set the first board perfectly horizontal with a spirit level — every board above follows from it.
Fixing timber cladding correctly is the single most important factor in how long it lasts and how good it looks — and the most common cladding failures in the UK are almost always the result of the same installation errors: wrong fixings, missing ventilated cavity, or no pre-drilling at board ends. This guide covers how to fix timber cladding correctly in the UK — the right batten system, the right fixings, the correct screw spacing and pre-drilling specification, how hidden fix systems work, and the step-by-step installation sequence from wall structure to finished board. Whether you are fixing Siberian larch, ThermoWood, Nordic spruce, or Shou Sugi Ban charred cladding, the installation principles are the same.
Siberian larch cladding installation in progress — boards being fixed upward from the base using A4 stainless steel screws into horizontal support battens. The quality and consistency of the installation determines both the visual result and the long-term performance of the cladding system.
The Correct Batten System for Timber Cladding UK
The ventilated batten system is the foundation of any correctly performing timber cladding installation in the UK — and the most common cause of premature cladding failure is either missing it entirely or installing it incorrectly. The correct system has three distinct layers over the wall structure:
Vapour permeable breather membrane fixed directly to the wall structure (masonry, timber frame, or SIP panel). Minimum 150mm overlaps on all horizontal laps, laps facing downward so water cannot track behind. All joints, corners, and penetrations taped with compatible membrane tape. The membrane is the primary weatherproofing layer — a gap or untaped joint allows wind-driven rain to reach the wall structure.
25x38mm minimum C16 or C24 treated softwood battens fixed vertically over the membrane, screwed through into the wall structure at stud or joist centres (typically 400–600mm). These create the ventilated cavity — minimum 25mm clear air gap — that allows boards to dry after rain and prevents moisture buildup. The cavity must be open at the base (with insect mesh) and at the top for air circulation. Without this cavity the cladding system will fail.
25x50mm minimum treated softwood battens fixed horizontally over the counter battens at maximum 600mm vertical centres (400mm for heavier profiles over 25mm thick). These are the fixing points for the cladding boards — every board must be fixed to a support batten. All battens must be level and in plane — a twisted or bowed support batten will telegraph into the finished cladding board alignment.

The complete batten system in progress — vertical counter battens over the breather membrane create the ventilated cavity, with horizontal support battens providing the board fixing points. This two-layer batten system is not optional — it is the cladding system. Without it, even the best naturally durable species will fail prematurely.
Timber Cladding Fixings UK — The Correct Specification
Galvanised, zinc-plated, or mild steel fixings must never be used on exterior timber cladding — particularly on naturally durable species (Siberian larch, Douglas fir, ThermoWood). The tannins in these species corrode galvanised coatings within 2–5 years, causing dark staining down the board face and structural fixing failure. Always specify A4 marine-grade stainless steel throughout. This is the single most common and most damaging installation error on DIY cladding projects.
A4 stainless steel fixings for exterior timber cladding — the correct specification for all exterior timber cladding in the UK. Marine-grade A4 stainless steel resists the tannins in naturally durable species and performs without corrosion throughout a 25–40 year cladding service life.
| Fixing type | Correct for cladding? | Notes |
|---|---|---|
| A4 stainless steel screws | ✅ Yes — always | The only correct specification for all exterior timber cladding. PFS+ C2 A4 4.5x45mm is the standard face fix screw |
| A2 stainless steel screws | ⚠️ Marginal | Suitable for sheltered or interior applications — not recommended for exposed exterior cladding. A4 is the correct exterior specification |
| Galvanised screws | ❌ Never | Corrode in contact with larch and other tannin-rich species. Causes black staining and fixing failure within 2–5 years |
| Zinc-plated screws | ❌ Never | Same problem as galvanised — not suitable for exterior timber cladding |
| Mild steel / bright zinc | ❌ Never | Will rust visibly and structurally within 1–3 years on any exterior application |
| Tiga hidden fix clips | ✅ Yes — rainscreen | Stainless steel concealed clip system for rainscreen profiles. Tiga 100-piece pack and 50-piece starter pack |
Screw Spacing and Pre-Drilling — The Correct Specification
Two screws per board at each batten crossing — one at each third of the board width. Pre-drill within 150mm of all board ends. 4.5x45mm A4 screws countersunk to just below the surface.
One screw per board at each batten crossing — centred on the board width. Pre-drill within 150mm of all board ends. Do not fix too close to the edge — minimum 20mm from board edge.
Pre-drill at all fixing points within 150mm of board ends to prevent splitting — mandatory on all naturally durable hardwood species including Siberian larch. Use a drill bit 0.5–1mm smaller than the screw shank diameter.
Maximum 600mm vertical centres for boards up to 20mm thick. Maximum 400mm for heavier profiles (25mm+) or on exposed/high-wind sites. Every board must be fixed at every batten crossing — no skipped fixings.
Leave 2–3mm expansion gap between boards on shadow gap and tongue and groove profiles — timber moves with moisture content. On ThermoWood the gap can be minimal due to low moisture movement. On shiplap and feather edge the overlap accommodates movement.
Minimum 150mm ground clearance for timber cladding between the bottom of the first board and finished ground level. This prevents water splash-back and insect ingress at the base of the cladding system. Non-negotiable on all installations.
How to Fix Timber Cladding — Step by Step Installation
Before fixing anything, check the wall is plumb, sound, and any structural defects corrected. Out-of-plumb walls can be packed out with the batten system but significant deviations require structural correction before cladding commences. Any wall penetrations (pipes, cables, vents) should be sleeved and ready to seal through the membrane.
Fix the breather membrane starting at the bottom of the wall and working upward — each course overlapping the one below by minimum 150mm so water cannot track behind. Staple at 300mm centres and tape all overlaps, corners, and penetrations with compatible membrane tape. The membrane must be taut with no tears or gaps.
Fix 25x38mm treated softwood counter battens vertically over the membrane, screwed into the wall structure (stud or masonry plug fixings). Space at stud centres or maximum 600mm. Check each batten is plumb before fixing. The counter battens must be in the same plane — use a string line to check alignment across the full elevation.
Fix insect mesh for cladding cavity (stainless steel or plastic) at the base of the cavity opening before fixing horizontal battens — the mesh prevents bird and insect ingress while allowing air circulation and drainage from the cavity base. Staple at 100mm centres, running the full width of the elevation.
Fix 25x50mm treated softwood support battens horizontally over the counter battens at maximum 600mm vertical centres. Use a spirit level to set each batten perfectly horizontal before fixing — a sloping support batten will produce sloping cladding boards that compound across the full elevation height. Use two screws per counter batten crossing minimum.
Before fixing any cladding boards, fit corner posts and window/door reveal boards. These define the frame within which the boards sit and ensure a clean junction at every corner and opening. Use the same species as the cladding boards. See our reveal board range and our dedicated corner details guide for the full junction specification.
Fix the first cladding board at the base of the elevation with minimum 150mm ground clearance. Use a spirit level to set it perfectly horizontal before fixing — this is the most important board on the whole elevation. Every board above it follows from the level of the first board. For shadow gap profiles, use a spacer to set the correct gap before fixing the second board.
Work upward board by board — pre-drilling within 150mm of all board ends, fixing with A4 stainless steel screws countersunk to just below the surface. Check horizontal alignment every 3–4 boards with a spirit level. Use a consistent spacer block to maintain shadow gap or board spacing. Never force a board — if it is not sitting correctly, find the cause before fixing.
The top of the cladding system requires ventilation provision at the eaves — either an open cavity behind the soffit or a ventilated cavity closer. This allows warm moist air to escape from the top of the cavity. Without top ventilation, the cavity cannot function correctly as a ventilated system. Fit insect mesh at the top ventilation opening as at the base.
Timber cladding installation in progress — boards fixed upward from the base with consistent alignment and A4 stainless steel fixings. The consistency of the board alignment across the full elevation height is the mark of a quality installation — and it starts with the first board being set perfectly horizontal.
Hidden Fix Timber Cladding UK — How It Works
Hidden fix (concealed fix) systems are used on open-joint rainscreen cladding profiles — they eliminate visible screw heads from the board face, producing a completely clean, contemporary board appearance. The Tiga facade clip system is the standard hidden fix specification for rainscreen cladding in the UK:
- How it works: The Tiga hidden fix system UK uses stainless steel clips fixed to the support battens between boards — each clip engages the groove on the back of the rainscreen board and holds it in position without any face fixing. The board face is completely screw-free
- Board profile required: Hidden fix only works with grooved rainscreen profiles — boards must have a machined groove on the back or edge for the clip to engage. Standard shadow gap, shiplap, and feather edge profiles are face fixed only
- Species compatibility: Works with Siberian larch rainscreen, ThermoWood rainscreen, and Nordic spruce rainscreen profiles. Our larch rainscreen 20x68mm and ThermoWood Tiga rainscreen 26x68mm are both designed for the Tiga clip system
- Fixing the clips: Start clips are fixed at the base — Tiga start clips (50-piece pack) — then standard clips between boards — Tiga 100-piece standard pack. Both are A4 stainless steel
Siberian larch and Douglas fir require pre-drilling at all board ends — the dense grain splits without pre-drilling. ThermoWood is more brittle than untreated timber due to the modification process — pre-drill at all fixings, not just board ends, and use a lower torque setting to avoid countersinking too deep. Nordic spruce (treated or untreated) pre-drill at board ends. Charred Shou Sugi Ban boards have a carbonised surface — pre-drill all fixings to prevent the charred layer from cracking or lifting around the screw head. See our full fixings guide for species-specific installation notes.
Most Common Timber Cladding Installation Mistakes UK
- Using galvanised or zinc-plated fixings: The single most common and damaging mistake. Always A4 stainless steel — no exceptions on naturally durable species
- No ventilated cavity: Cladding fixed directly to a wall without a batten system will fail prematurely. The ventilated cavity is not optional — it is the system
- Not pre-drilling at board ends: Larch, Douglas fir, and ThermoWood boards will split when screwed within 150mm of the end without pre-drilling. Split boards cannot be fixed — they must be replaced
- First board not level: Every board above the first follows its level. A board 2mm out of level at the base will be visibly out of horizontal by the top of a standard elevation. Set the first board with a spirit level and do not move on until it is correct
- Unsupported batten crossing: Every board must be fixed at every support batten crossing — skipping battens leaves boards unsupported and they will bow outward over time
- No insect mesh at cavity base: Without mesh, birds and insects colonise the cavity base — causing blockage that prevents drainage and ventilation
- Insufficient ground clearance: Less than 150mm ground clearance allows water splash-back onto board ends and accelerates base board deterioration regardless of species
What fixings should I use for timber cladding UK?
Always A4 marine-grade stainless steel screws — never galvanised, zinc-plated, or mild steel. PFS+ C2 A4 stainless 4.5x45mm is the standard face fix cladding screw. Galvanised fixings corrode in contact with tannins in naturally durable species (larch, Douglas fir) within 2–5 years, causing staining and structural failure.
Do you need a batten system for timber cladding UK?
Yes — always. Breather membrane → vertical counter battens (25x38mm) → horizontal support battens (25x50mm) → cladding boards. The ventilated cavity cladding UK system allows boards to dry after rain and prevents moisture buildup. Ground clearance for timber cladding of minimum 150mm at the base is equally critical. Pre-drilling timber cladding board ends prevents splitting on all naturally durable species. Without it, cladding fails prematurely regardless of species.
Can I fix timber cladding myself UK?
Yes — achievable as a DIY project for a competent builder. Key requirements: correctly installed breather membrane, plumb and level batten system, A4 stainless fixings, pre-drilling at board ends, 150mm minimum ground clearance. Most DIY failures are caused by galvanised fixings, missing ventilated cavity, or no pre-drilling.
What is the correct screw spacing for timber cladding UK?
Two fixings per board per batten for boards 140mm and wider. One fixing for boards under 100mm. Pre-drill within 150mm of all board ends. Maximum 600mm batten centres (400mm for profiles 25mm+). Fix at every batten crossing — no skipped fixings.
What size battens do I need for timber cladding UK?
Vertical counter battens: 25x38mm minimum C16 treated softwood. Horizontal support battens: 25x50mm minimum C16 treated softwood. Both must be pressure treated — untreated softwood battens in a closed cavity will rot within 5–10 years even with a breather membrane. See our full fixings and batten guide for the complete specification.
Timber Cladding Fixings & Battens — Nationwide Supply
We supply A4 stainless steel cladding screws, Tiga hidden fix clip systems, and all timber cladding profiles including Siberian larch, ThermoWood, Douglas fir, Nordic spruce, and Shou Sugi Ban charred cladding. FSC and PEFC certified. 7–14 day UK delivery. Ground clearance timber cladding installation guidance available on request.