Shiplap Cladding Explained: Profiles, Uses & Installation

Shiplap timber cladding installed horizontally on exterior facade

Shiplap cladding is one of the most recognisable timber cladding profiles, valued for its clean horizontal lines and practical overlapping joint. While often associated with sheds and outbuildings, shiplap has evolved into a versatile cladding solution used across a wide range of exterior applications where simplicity, weather resistance, and ease of installation are important.


This article explains shiplap cladding as a system rather than just a board profile. Understanding how shiplap boards are formed, how they manage moisture, and how they should be installed is essential for achieving long-term performance, particularly in the UK’s variable climate.

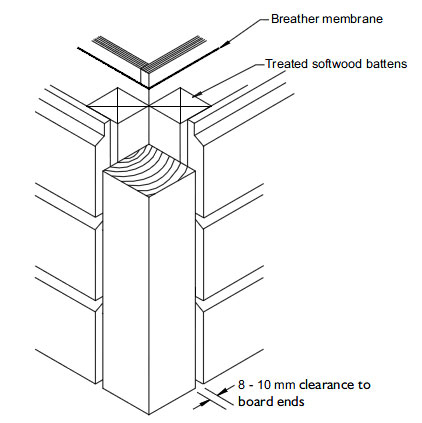
Shiplap boards are characterised by a rebated edge that allows each board to overlap the one below. This creates a tight joint that sheds water effectively while maintaining a consistent shadow line across the façade. Because of this profile, shiplap timber cladding is often selected for projects where a traditional appearance and reliable weather protection are required.


Profile depth and board thickness play an important role in performance. Deeper rebates improve water run-off, while sufficient board thickness helps reduce the risk of distortion over time. As with all timber cladding, allowance must be made for seasonal movement, even with tightly jointed profiles such as shiplap.

Shiplap cladding boards showing overlapping profile detail


Shiplap cladding is most commonly used on sheds, garden rooms, garages, and ancillary buildings, but it can also be specified on residential façades where a simple, uniform appearance is desired. Its overlapping joint makes it particularly well suited to exposed locations, provided correct detailing and ventilation principles are followed.


The popularity of shiplap in garden buildings has led to a wide range of design approaches, from traditional sheds to contemporary garden studios. A more detailed look at these applications can be found in our shiplap shed cladding guide, which explores how the profile is adapted for different uses.


Installation quality has a significant impact on lifespan. Shiplap boards must be installed onto a properly ventilated batten system to allow moisture to escape from behind the cladding. Fixings should be corrosion-resistant and positioned to allow the boards to expand and contract without splitting or cupping.


Orientation also affects installation strategy. Horizontal shiplap cladding requires vertical battens to maintain airflow, while careful attention must be paid to base details, corners, and terminations. These areas concentrate moisture and movement stresses and should never rely on sealed joints alone.

Shiplap cladding installation with ventilated batten system

When selecting shiplap cladding boards, consistency of machining and timber quality are key considerations. Uniform board profiles and accurate dimensions help achieve a cleaner finish and simplify installation, reducing the likelihood of gaps or misalignment over time.

Detailing around openings and junctions is just as important as board selection. Window reveals, corners, and changes in level must maintain cavity continuity and protect exposed end grain. Guidance on installation detailing helps ensure that shiplap cladding performs as part of a complete, well-resolved system.

Shiplap cladding detail at corner and junction


When treated as a coordinated system rather than a simple profile choice, shiplap cladding offers a durable and adaptable solution for a wide range of exterior applications. Its continued popularity reflects a balance between straightforward installation, reliable weather protection, and a timeless visual character.

0.0 0 Reviews
Leave review
Rate
Upload Photos
Cancel