
- Breather membrane first: Vapour-permeable membrane fixed to the wall structure before any battens.
- Counter battens: Minimum 25x38mm treated softwood, fixed vertically over the membrane.
- Support battens: Minimum 25x50mm, fixed horizontally over counter battens at max 600mm centres.
- Fixings: A4 stainless steel throughout — face-fix screws or Tiga hidden fix track system.
- Pre-drill board ends: Within 150mm of any end — ThermoWood is slightly more brittle than untreated pine.
- Expansion gaps: 5–6mm between boards, consistent throughout.
- 150mm ground clearance minimum: Bottom of cladding above finished ground level.
Installing ThermoWood cladding correctly is what determines whether you get the full 25–40 year BRE endorsed service life or a facade that underperforms regardless of the material's inherent quality. See our ThermoWood cladding cost guide for material budgeting. The good news is that ThermoWood is genuinely straightforward to install — lighter than hardwood, no preservative residue to manage, and consistent factory dimensions that make for predictable, repeatable fixing. This guide covers the complete installation sequence from breather membrane through to final board fixing, including the Tiga hidden fix system, junction detailing, and the handful of mistakes that account for almost every premature cladding failure we see.
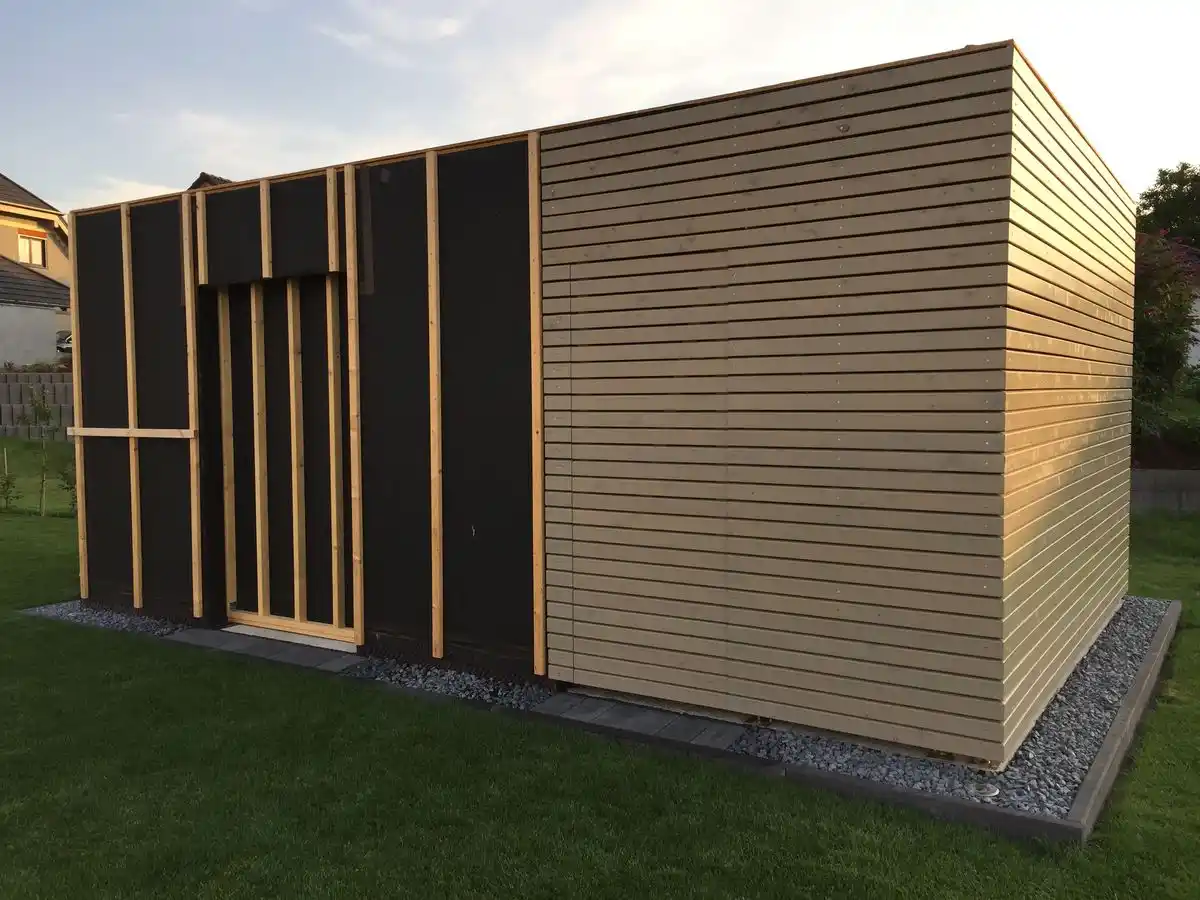
Garden room cladding installation in progress — breather membrane and ventilated batten system fitted ahead of the ThermoWood boards. Correct batten and membrane installation is the single most important factor in achieving the full service life of any cladding species.
Step 1 — Wall Preparation and Breather Membrane
The wall substrate — blockwork, timber frame sheathing, or insulation board — should be complete, dry, and structurally sound before cladding work begins. See our timber cladding building regulations guide for the full compliance picture. Confirm any required insulation and air-tightness layers are installed per the building's design before proceeding to the external cladding system.
Install a vapour-permeable breather membrane across the full wall area, working from the bottom up so each course overlaps the one below by minimum 150mm — this ensures water runs over joints rather than into them. Fix with galvanised clout nails or staples at 150–200mm centres. The membrane allows moisture vapour from inside the building to escape outward while preventing wind-driven rain from penetrating the wall construction.
Seal all membrane overlaps, joints, and any penetrations (cable entries, pipe penetrations) with a compatible breather membrane tape. A membrane that is not fully sealed loses its weather protection function at every gap — this is a detail worth getting right rather than rushing.
Step 2 — Counter Battens and Support Battens
Fix C16 treated softwood counter battens (minimum 25x38mm) vertically over the breather membrane, at centres matching the wall studs or fixed into masonry with appropriate frame fixings. The counter battens create the primary ventilated cavity behind the cladding — this cavity is what allows air to circulate and boards to dry quickly after rain, and is the single most important detail for long-term cladding performance.
Fix horizontal support battens (minimum 25x50mm) over the counter battens at maximum 600mm centres for standard face-fix ThermoWood profiles — closer at 400mm centres for heavier profiles such as double or triple shadow gap. These battens provide the fixing point for the cladding boards. For vertical cladding orientation, this sequence is reversed — horizontal counter battens first, then vertical support battens.
Ensure the ventilated cavity created by the batten system is open at both the top (typically at eaves or parapet) and bottom (above ground level, behind a vermin-proof mesh) of each elevation. A cavity that is sealed at either end defeats its ventilation purpose — air must be able to enter at the bottom and exit at the top for the system to function correctly.
The single most common installation shortcut that leads to premature cladding failure is reducing or eliminating the ventilated batten cavity — fixing boards too close to the wall, using undersized battens, or skipping the counter batten layer entirely. Even ThermoWood's exceptional dimensional stability and Durability Class 2 performance cannot fully compensate for a facade that cannot ventilate and dry between rain events. The batten system typically adds 10-15% to material cost but is responsible for the majority of the difference between a cladding installation that reaches its full 25–40 year service life and one that fails within a decade.
Step 3A — Face Fix Board Installation
Establish a level starting line for the first board — typically at the base of the elevation, working upward. Use a laser level or string line across the full elevation width to confirm the starting point is consistent before fixing any boards.
See our ThermoWood cladding maintenance guide for post-installation care. Pre-drill with a 3mm pilot drill at any fixing point within 150mm of a board end — ThermoWood's thermal modification makes it slightly more brittle than untreated pine, and pre-drilling eliminates the risk of splitting. Fix with A4 stainless steel screws at each support batten crossing, countersunk flush. Two fixings per board per batten for wider profiles (140mm+), one fixing for narrower profiles.
Use 5–6mm spacers between boards throughout — ThermoWood's low equilibrium moisture content means it moves less than softwood, but seasonal expansion still occurs and consistent gaps prevent board contact during warm humid periods. Check gap consistency regularly across the elevation, not just at the start.
Apply exterior oil to every site-cut board end immediately after sawing, before fixing in position. End grain is the primary moisture entry point on any timber board — sealing it before installation, while the cut is fresh and accessible, is significantly more effective than treating after fixing.
Step 3B — Tiga Hidden Fix Installation
The Tiga facade system provides completely hidden fixings for ThermoWood rainscreen profiles, producing a clean board face with no visible screw heads anywhere on the elevation.
Screw the Tiga track system to each horizontal support batten using A4 stainless screws at the specified spacing per the manufacturer's installation guide. The track creates the engagement point for each board clip. See our ultimate ThermoWood cladding guide for the complete specification picture.
Press each ThermoWood rainscreen board onto the Tiga track clips — the board's pre-machined groove engages directly with the track without any face screwing. Work systematically from the starting edge across the elevation, checking each board seats fully onto every track crossing before moving to the next.
The Tiga track typically pre-sets the open joint gap for the rainscreen system — confirm the gap is consistent across the full elevation as you install each board. For a starter pack of 50 Tiga clips covers a smaller trial area or sample panel before committing to a full elevation order.
Junction and Detail Work — Where Cladding Most Often Fails
- Window and door reveals: Install a window board or reveal trim that directs water away from the opening — never allow cladding boards to butt directly against a window frame without a drip detail. Water tracking behind window frames is one of the most common causes of localised cladding and structural decay
- Head flashing above openings: Fit a continuous head flashing or drip bead above every window and door, projecting at least 25mm beyond the cladding face, to throw water clear of the opening below
- Sill details: Window sills should slope away from the building at minimum 5 degrees and project beyond the cladding face with a drip groove on the underside to prevent water tracking back to the wall
- Eaves and verge detailing: Provide adequate roof overhang and correctly detailed soffit ventilation that does not compromise the cladding's top ventilation point
- Corner details: Use a consistent corner detail (mitred, butt-jointed with corner trim, or board-on-board overlap) throughout the project — inconsistent corner treatment is a common source of both water ingress and poor visual quality
- Base detail and ground clearance: Minimum 150mm clearance between the bottom of the cladding and finished ground level, with a vermin-proof mesh covering the ventilation opening at the base of the cavity
The majority of premature timber cladding failures we investigate originate at junctions — window reveals, sills, corners, and base details — rather than across the main field of boards. Getting the species and profile right is necessary but not sufficient; correct junction detailing is what actually determines whether a facade reaches its full service life. See our detailed timber cladding detail drawings guide for full junction specification.
Common ThermoWood Cladding Installation Mistakes
| Mistake | Consequence | How to avoid |
|---|---|---|
| Insufficient batten cavity depth | Reduced ventilation — accelerated deterioration regardless of species | 25x38mm minimum counter battens, no exceptions |
| No breather membrane | Wind-driven rain penetrates wall construction | Vapour-permeable membrane on every project, every wall type |
| Not pre-drilling board ends | Board splits at fixing points | 3mm pilot drill within 150mm of every board end |
| Standard steel fixings | Corrosion within 3–5 years, rust staining | A4 stainless throughout, verify before ordering |
| Insufficient ground clearance | Ground splash moisture accelerates bottom-board decay | 150mm minimum, always |
| No drip detail at window heads | Water tracking causes localised decay around openings | Head flashing projecting 25mm minimum beyond cladding face |
| Inconsistent expansion gaps | Visible variation, possible buckling in humid conditions | 5mm spacers used consistently throughout |
How do you install ThermoWood cladding?
Fix breather membrane to the wall, install counter battens vertically, fix horizontal support battens over them to create a ventilated cavity, then fix the cladding boards with A4 stainless fixings — face-fix screws or Tiga hidden fix. Pre-drill board ends, maintain 5–6mm gaps, seal all cut ends with exterior oil.
What size battens are needed for ThermoWood cladding?
Counter battens minimum 25x38mm, fixed vertically first. Support battens minimum 25x50mm, fixed horizontally over the counter battens at maximum 600mm centres for standard profiles, 400mm for heavier profiles. Both must be C16 minimum grade pressure treated softwood.
Does ThermoWood cladding need a breather membrane?
Yes — a vapour-permeable breather membrane is standard practice between the wall structure and the batten system on all wall types. It prevents wind-driven rain penetrating the wall while allowing moisture vapour to escape outward.
How do you install Tiga hidden fix ThermoWood cladding?
Fix the Tiga track to each horizontal batten with A4 stainless screws, then press each rainscreen board onto the track clips — the board's pre-machined groove engages directly without face screwing. Produces a completely clean facade with no visible fixings.
ThermoWood Cladding — Complete Installation Materials from UK Stock
We supply ThermoWood cladding boards, treated battens, breather membrane, A4 stainless fixings, and Tiga hidden fix components from UK stock. Tell us your elevation dimensions for a complete material list, including everything needed for correct ventilated batten installation. Nationwide delivery 7–14 days.